
|Articles|March 1, 2012
- LCGC Asia Pacific-03-01-2012
- Volume 15
- Issue 1
Headspace Sampling: Instrumentation
Author(s)John V. Hinshaw
The article discusses the fundamentals of instrumentation for headspace sampling, including vial thermostating, pressurization and transfer to the GC inlet.
Advertisement
The previous instalment of this column on headspace sampling for gas chromatography (GC) (1) discussed the basic physicochemical processes that determine the contents of the gaseous headspace above a sample in a sealed vial. Although it is possible — and sometimes even desirable — to sample and inject headspace directly into a GC system with a hand-held syringe, most of the time analysts will call upon an automated headspace sampler to acquire and transfer appropriately sized fractions of the headspace into a GC system's inlet. Aside from providing the benefits of better accuracy and repeatability similar to what's gained with a liquid autosampler compared to manual injections, automated headspace samplers control other crucial variables beyond timing. Temperature, pressure and flow rates in addition to the timing parameters, strongly influence the composition of the headspace gas as it appears at the GC column or inlet. Headspace autosamplers and the associated sampling methods are more complex than their liquid autosampler counterparts; they comprise a richer set of choices that chromatographers should understand and manage to obtain the best possible results.
The Inside Story
Most analysts are familiar with the inner workings of a liquid autosampler. Basically, the device is a robotic arm that actuates a microsyringe with better precision and accuracy than a mere human operator could achieve. Peering underneath the covers, it's not difficult to see and understand the motions and gyrations that a liquid autosampler undergoes as it processes sample after sample.
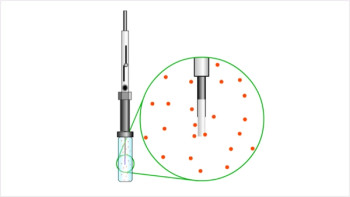
A headspace autosampler is different. The mechanical tasks of vial positioning and needle movement in and out of the vial septum are familiar, but there is much more going on than meets the eye. The inner workings of a headspace autosampler are hidden underneath insulation and internal housings. It's not easy to observe the device's pressures and temperatures without attaching thermocouples and gauges at inconvenient locations. Of course, the designers and engineers who created the autosampler would have done so as part of the development process. For analysts, these physical properties are abstracted to the list of settings and timings that make up the sampling method. What, then, are the relationships between the sampler settings and the physical processes that result in sample injection?
Three Steps
Modern autosamplers that perform equilibrium headspace sampling enact three fundamental steps for sample injection: equilibration, pressurization and sample transfer. Each sampler model supplements these three with additional nuances and enhancements. Certainly, there is more to discuss about these details, but that extends beyond the scope of this article. The three principal steps can be delineated as follows.
Equilibration
Equilibration is the most important headspace sampling step. Careful attention toward choosing appropriate equilibration temperatures and times during method development helps ensure a robust and longlived procedure. Equilibration is the period between when a vial is filled with sample and sealed and when the sampler needle enters the vial to commence sample acquisition. During equilibration, sample components partition between sample and headspace, and equilibrium is reached after their concentrations attain constant values. Each component migrates at its own temperaturedependent rate, so the slowest-moving component of interest determines the minimum equilibration time period.
Very volatile components start to migrate out of the sample phase immediately during sample preparation, and significant amounts can be lost to the atmosphere with concomitant reduction in sample recovery along with poor repeatability. Sample handling and preparation at reduced temperatures can help reduce such pre-vial losses. Careful attention and consistent sample handling procedures aid in improving repeatability.
In addition to different migration rates across the sample-headspace interface, each component has its own temperature-dependent solubility coefficient, K. For most commonly encountered solute-solvent systems the solubility coefficient decreases as the temperature increases, thereby raising analyte concentrations in the headspace at higher temperatures. Thus, careful control of vial temperatures during equilibration is important for obtaining both consistent quantitative results and equilibration times.
The contents of headspace vials may attain an initial equilibrium state at room temperature in an external sample tray while waiting for the actual headspace process to begin, but they will cease to be in equilibrium once inserted into a heated carousel before sampling. As soon as the temperature changes, the contents of the headspace will shift in response to the changes in solubilities. In certain cases, the prethermostating wait time may influence the overall equilibration time; method developers may need to take this into account and allow sufficient equilibration time for the shortest anticipated wait time between vial preparation and the start of equilibration.
Vial heating is one of the most important aspects of a headspace sampler. Early samplers used water or even oil baths for consistent results, but modern headspace devices employ either a solid metal heating carousel or, in some cases, a carefully controlled air bath oven arrangement. A vialtovial temperature control precision of about ±1–2 °C should yield acceptable results consistently. Absolute temperature accuracy influences inter and intralaboratory reproducibility of results. Headspace samplers should be calibrated consistently to a standard reference thermometer about every six months if sample calibration procedures cannot establish sufficient results comparability.
Headspace sampling temperature dependencies lead to the general use of elevated equilibration temperatures. Higher equilibration temperatures are desirable for both greater headspace sensitivity and shorter equilibration times. Choosing an equilibration temperature of at least 15 °C above room temperature will ensure good thermal control, but there are limits to how high equilibration temperatures can be pushed.
Elevated temperatures can accentuate the breakdown of thermolabile materials, and a careful study of such effects should be performed when there is any question of analyte stability. In addition, high temperatures may degrade the performance of headspace vial septa that are not designed for hightemperature applications and cause both leaks and sample contamination with septum bleed components.
Many headspace samplers stir or agitate the vial to speed up equilibration. As components leave the liquid phase at the gas–liquid interface, the reduced solute concentrations in the interfacial liquid layer are replenished relatively slowly by molecular diffusion from the bulk of the liquid. Convective stirring occurs naturally to some extent, but mechanical mixing is more effective toward replenishing solute that has entered the gas headspace phase.
Another side effect of elevated equilibration temperatures is an increase in the internal or "natural" vial pressure before the actual sampling step. Most of this pressure is created by the vapour pressure of the solvent. Water as a headspace solvent has a vapour pressure of close to 1 atm (101 kPa) at 100 °C, and other more volatile solvents can create similar or higher pressures if present in significant quantities. Internal vial pressures increase exponentially as temperatures increase, and it is possible to generate pressures high enough to breach the vial septum seal or even burst the vial itself.
The natural vial pressure can be measured with a needle-mounted pressure gauge while a test vial with sample is heated in a small external chamber. Most chromatography suppliers and manufacturers can provide such equipment. When high pressures are anticipated, use a selfventing septum safety cap to prevent equipment damage. It is better to have to repeat analyses than try and remove broken glass from a delicate piece of equipment.
Besides the danger of broken glass or lost sample, natural vial pressures that are too high can affect the pressurization stage of headspace sampling by causing sample vapours to depart from the vial too early in the sampling process. Such an occurrence causes doubled peaks, poor repeatability or both.
Pressurization
After the contents of a headspace vial have reached equilibrium, the headspace gas is ready to be transferred into the GC inlet. The most common mechanism to effect this transfer involves pressurization of the headspace in the vial with inert gas via a hollow heated needle, followed by release of the pressure back into the sampler pneumatics via the same needle. This approach is different than the usual manual headspace sampling procedure, in which a gas-tight syringe withdraws a portion of the headspace by outward displacement of the syringe plunger. Of course, it is possible to fill a manual syringe with inert gas, displace the gas into the headspace vial, and then withdraw it.
The automated pressurization method establishes a consistent vial pressure. In the sample transfer phase, this pressure drives sample through the autosampler internal pneumatic tubing directly into the inlet or column in a balanced pressure system, as presented in Figure 1. In a loop-type system (see Figure 2), the vial pressure moves sample gas into an internal sample loop from which it enters the GC inlet upon switching a sampling valve. The majority of applications use carrier gas directly for pressurization, although it is possible to utilize an independent gas source for pressurization and transfer in certain situations, such as when the carriergas inlet pressure is too high for the headspace vials or septa to withstand or when inlet split flow is supplied from a separate flow controller.
Pressurization should establish a vial pressure that is greater than the natural vial pressure. If not, then sample headspace gases will flow out of the vial into the needle upon the needle's entry into the vial. This initial extraneous reverse sample pulse can either enter the column directly and cause double peaks or can be lost in the subsequent sample transfer step. Excessive vial pressurization can open septum safety seals or even burst the vial, so the pressurization set-point is subject to the same limitations as the natural vial pressure.
A short pressurization delay time before sample transfer out of the vial allows the introduced gas to mix thoroughly with the gaseous headspace contents. An interval on the order of 30 s or so is suitable. The added gas will act as a sample diluent in a loop-type system when the pressure of the sampled gases is vented before column introduction. The higher the pressurization level, the more dilution will occur upon venting.
Sample Transfer
After pressurization, sample gas from the vial flow is allowed to flow back into the autosampler pneumatics via the vial needle, driven by the pressure gradient that was established during pressurization. If the sample needle is connected directly to the column, as in some configurations of a balanced pressure system, then the gas in the vial effectively becomes the carrier gas source during the sample transfer interval. The vial pressure decays during sampling. Longer sampling intervals will yield larger injected amounts, up to the point where the column flow decreases more than is desirable.
With proper calibration and precise timing, this arrangement will yield very reproducible results as long as the vial pressure does not decay excessively. For short sampling intervals with column flows under about 2–3 mL/min, solute amounts entering the column or inlet are roughly proportional to the sampling interval. Long sampling intervals will produce incrementally larger peaks, but the column and inlet system's requirements for injected peak widths may impose a practical upper limit on the sampling interval, especially for early, weakly retained peaks. In some cases, an intermediate solute trap can adsorb and, upon rapid heating, release solutes in a narrow band that helps extend the maximum sampling interval.
For headspace samplers with a sample loop, pressurized sample gas from the vial is directed through the sample loop to vent through a restrictor. A minimum sampling interval is required to flush the loop with sample gas. The total sampling interval and initial pressurization determine the residual loop pressure at injection. Longer sampling intervals result in lower loop pressures, which then yield lower injected peak areas as an increasing fraction of the headspace vial gas is vented to the surroundings. As with the direct injection type of system, careful control of pressurization and sample interval timing is required for the best results.
Upon injection, the loop contents are switched into the carrier gas stream and carried along to the GC inlet or column directly.
Variability in the bulk headspace gas composition — such as the presence or absence of significant amounts of solvent in samples compared to standards — can affect the flow rate of sample gas from a headspace vial either directly into the column or through a sample loop and into a restrictor. Added solvents may change the viscosity of the gas mixture, which then affects the flow rates accordingly. Thus, sample and standard headspace vials should contain solvent systems that are as closely matched as possible.
Mechanics
There are a few different mechanical arrangements employed in headspace autosampling systems. Headspace samplers are available that recreate hand motions with a captive syringe, similar to liquid autosamplers. These systems are relatively simple to understand by mimicking laboratory technicians. The two other types of headspace samplers are more pertinent for this discussion: balancedpressure and loop-sampling. Figures 1 and 2 illustrate the salient features of these two designs, albeit in a simplified fashion that omits a number of nuances that go beyond the limits of this column. Despite these simplifications, the diagrams should provide a better understanding of what's hidden beneath the covers of many automated headspace sampling systems.
Balanced-Pressure Sampling
Figure 1 shows how a direct-injection or pressure-balanced headspace sampler works. The vial transport and thermostating details are not included: Readers can assume that the vial as shown is at its equilibrium temperature.
The standby configuration [Figure 1(a)] is in use at times other than when actively sampling. In this configuration, carrier gas flows into the column or inlet at the normal column flow rate through a heated transfer line that encases inert deactivated metal or fused-silica transfer tubing, or even the first meter or so of a fused silica column itself. If valve V2 is opened then a secondary flow of carrier gas transits the integrated needle carrier and exits to vent through a restrictor (not shown). The carrier supply is normally pressure controlled for capillary or packed columns. If an inlet splitter is employed, then the split flow is supplied separately at the GC inlet in this type of system.
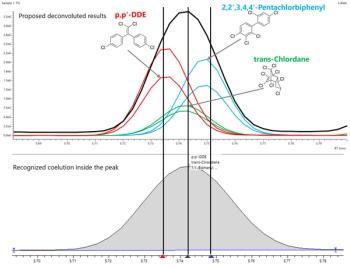
Figure 1: Reconstructed chromatogram for a certificate of analysis. The arrow marks the column dead time.
When the system is ready for pressurization, the needle is lowered by a motorized mechanism (omitted) [see Figure 1(b)]. As the needle moves downward past the lower seal, carrier gas begins to flow through it. Carrier gas flows into the vial once the needle has penetrated the septum. The carrier gas will continue to flow into the vial until the internal vial pressure is equal to the carrier gas pressure. During the pressurization interval, carrier gas continues to flow out through the transfer line and column as well.
At the end of the pressurization time, after the vial has reached the carrier gas pressure and the sample and carrier gases in the vial have mixed sufficiently, valves V1 and V2 are turned off [see Figure 1(c)]. The incoming carrier-gas supply and the outgoing vent are cut off, and gas from the headspace vial, shown here in dark blue, is directed straight to the column or inlet via the heated transfer line. Sample injection occurs at this moment.
Carrier gas flow to the column is re-established after the sampling interval has elapsed by activating valve V1 again [see Figure 1(c)]. Remaining pressure in the vial may be optionally vented by lowering the needle until its top hole clears the lower seal, as shown in Figure 1(d). Finally, as sample begins to be separated on the column, valve V2 is opened and the needle is withdrawn from the headspace vial. Sample gas that remains in the needle is flushed out by momentary outgoing carrier flow as the needle moves upward, until the lower hole enters the sealed area inside the needle carrier. The system has returned to the standby position and remains there until the next sampling cycle begins.
Loop Sampling
Simplified loop-sampling headspace system pneumatics are shown in Figure 2. A six-port sampling valve selects whether sample from the headspace vial or carrier gas to the column flows through the sample loop. A separate auxiliary input provides gas for headspace vial pressurization, although in practice carrier gas usually is connected to both inputs. The entire pneumatic path and valving are heated. In the standby position, shown in Figure 2(a), carrier gas flows directly to a heated transfer line and onward to the column or inlet. The sample loop and headspace needle can be purged with auxiliary gas by activating valve V1 as shown in the figure.
Figure 2: Loop-type headspace sampling. (a) standby; (b) pressurization; (c) loop filling; and (d) injection. Orange connecting lines denote inert gas flows; blue lines denote sample gas.
When the system is ready for vial pressurization, the needle is lowered into the vial; in some designs, the vial is raised up over the needle. With valve V1 open and V2 closed, pressurization gas flows into the vial until the set pressurization level is reached [see Figure 2(b)]. After the pressurization time has elapsed, the contents of the vial headspace are ready for transfer into the sample loop. During this time, carrier gas continues to flow directly to the column.
To initiate sample transfer into the sample loop, valve V1 is closed and valve V2 is opened [see Figure 2(c)]. Now, the pressure in the headspace vial drives sample gas into the sample loop and outward through valve V2 and a vent restrictor (not shown). When sufficient time has elapsed to fill the loop with a representative sample, valve V2 is also closed. A brief loop equilibration or settling time ensues.
At this point, the system is prepared for injection. The six-port valve position is switched, which inserts the sample loop into the carrier gas flow and sends sample onward to the column or inlet, as illustrated in Figure 2(d). The duration of the injection period should be sufficient to transfer all of the loop contents into the transfer line.
The sample amount can be controlled by changing the size of the sample loop or reduced by using higher pressurization levels along with longer sample loop transfer times, which will dilute the sample with more auxiliary or carrier gas. It is also possible to set up a short injection time that causes partial sample loop transfer, but this may impact results repeatability in an unfavourable way.
Valve V2 can be left open during the sampling interval to vent the remaining headspace gases from the vial, or it can be closed when the six-port valve is actuated. After sampling has finished, the six-port valve is returned to its original position and the system returns to its standby state while the sample components are separated. If valve V2 is open at this point, any sample remaining in the loop will be vented out through the needle.
Conclusion
This instalment presented the basic operation of two types of headspace autosampler: balanced-pressure sampling and loop sampling. Requirements for headspace sampling temperatures, pressures, flows and timing were introduced, and the mechanical frameworks for each type of sampler were outlined. These simplified explanations can help with an understanding of what goes on under the hood or boot of a headspace autosampler. However, the exact details of each type of sampling system differ from one model to another. Always follow the manufacturer's advice and guidelines for use and maintenance.
"GC Connections" editor John V. Hinshaw is senior research scientist at BPL Global Ltd, Hillsboro, Oregon, USA and a member of LCGC Europe's editorial board. Direct correspondence about this column should go to LCGC Europe editor, Alasdair Matheson, 4A Bridgegate Pavilion, Chester Business Park, Wrexham Road, Chester, CH4 9QH, UK or e-mail
References
(1) J.V. Hinshaw, LCGC N. Amer., 29(10), 914–924 (2011). Instrumentation
Articles in this issue
Advertisement
Related Content
Advertisement


Advertisement
Advertisement
Trending on LCGC International
1
The Silent Crisis: Can The Demise of Chromatography Teaching in Universities Be Reversed?
2
Multiplexed HILIC-HRMS Method Quantifies LPC and CAR Biomarkers for HCC
3
SPME in Practice: Techniques, Tips, and Troubleshooting
4
HTC-19 Insights: HPLC–XRF for Environmental Analysis — Future Developments
5